Showing posts with label baking. Show all posts

Tuesday, December 3, 2013

Tabasco Broccoli Recipe - Low Carb, Paleo & Keto Friendly

I think that about sums it up. Depending on if you, as a paleo eater, low carb eater or Maria Emmerich healthified eater incorporate peanuts.
Because this recipe has peanuts.


This recipe is adapted from a pin I found that lead me to FoodandOtherthings recipe for Sriracha Broccoli  and because Sriracha has sugar in it... 
...I'm not eating it, okay?! :) 

However I would like to add some spicy broccoli goodness to my kitchen recipes
 so here is my low carb, healthified version - Enjoy! :) 


Tabasco Broccoli Recipe

7 cups Broccoli Florets
1/4 cups chopped peanuts
2 garlic cloves minced
1 1/2 Tablespoons Eden Tamari Soy Sauce Naturally Brewed
1 1/2 Tablespoons Sesame Oil
1 Tablespoon Tabasco
Black Pepper to taste

Preheat oven to 400 degrees.

1) Mix all ingredients in a medium large bowl until all florets are covered with some spicy goodness.
2) Put parchment paper over a cookie sheet.
3) Add all the mix on top of the parchment paper and sprinkle as much black pepper as you'd prefer ontop.
4) Pop that pan in the oven and bake for 7 minutes, then toss the mix, put broccoli back in the oven for 8 more minutes.

**BING**

Once your timer goes off the dish is done! Super simple right? ...and delicious :). ;).  

It's tasty on its own but I think it'd make a great side to chicken *or* paired with cottage cheese. Yum! :)

Also... peanut butter... a side of straight up peanut butter if you so desire and it works with your diet would make this super yummy! :) 


PS - If you have adapted the Paleo diet and love Sriracha (almost) without abandon... then check out Nom Nom Paleo for her Paleo Sriracha recipe. :) 

Let me know what you think if you try this recipe!
 Happy Creating, Dawn

*****

Looking for more Low Carb recipes to bake? 
Since posting this recipe I've started a foodie blog! 

Find more low carb BAKING RECIPES HERE.

***** 

Sunday, December 1, 2013

Cheesy Bread Sticks Recipe - Low Carb


I didn't have cottage cheese, nor did I want to use coconut flour because the misters tasty sensors are super sensitive and do not like coconut flour :/. So here I go improvising :). For the win I might add ;). So for those of you who are into cheesy bread sticks that are full of awesome and cheese  - this ones for you! ;)

Cheesy Bread sticks Recipe - Low Carb

Adapted from Maria Emmerich's Mini Muffin Recipe

1 cup shredded mozzarella cheese
1/2 cup sour cream
1/2 cup cream cheese
5 Tblspns Almond flour
5 Eggs
1 tsp aluminium free baking powder
1/2 tsp salt
Bacon grease

Italian Seasoning Mix:

4 Tblspns Parmesan Cheese
3 Tblspns Garlic Powder
1 1/2 Tblspns Italian Seasoning
1) Preheat oven to 400 degrees. Grease a square baking dish with bacon grease.
2) Mix the cheeses, almond flour, baking powder, eggs, salt and 1/2 of the Italian seasoning in a medium size bowl until smooth.
3) Pour cheesy goodness into the greased square baking dish. Top with remaining seasoning mix. 
4) Bake for 30-35 minutes or until golden brown. 
5) Serve hot or at room temperature, whichever you prefer.
*******
Here we are - cheesy bread sticks - fresh out of the oven. :) 
Enjoy!

*****
Looking for more Low Carb recipes to bake? 
Since posting this recipe I've started a foodie blog! 

Find more low carb BAKING RECIPES HERE.
***** 

Sunday, September 22, 2013

Low Carb Game Day Recipe Eats


Last weekend my sister, my husband and I sat down to watch the Redskins game. I had every intention of making up a recipe I found on pinterest for cheddar jalapeno burgers with guacamole by sunnyslideup but about half time we realized our team wasn't doing so hot, and though everyone was down to eat burgers before the game started my husband said "I think I might need pizza just to make me feel better" ;). I love his humor ^-^. I realized my energy was low, really low... too low to dice, cut, slice, measure and then stand over the stove to cook them bad boys. So, pizza hut won... I caved... I was bummed about this choice, I wanted to feed us all something nutritious and not carb laden .. I normally eat that stuff way too fast, and of course regret it the next day and even that night because my stomach and guts are like, "What were you thinking?!" Try as I might to ignore their voices I really can't because they are painfully loud :/ . Whaa. Right? ;) lol Whaa indeed!  

That was a week ago... fast forward to this week. I was determined to have fun food for our football watching time that I hand selected and approved of. 

32 Hard boiled Eggs, 30 jalapenos, 3 packs of bacon cooked up & 2 cucumbers later...  I ended up with a fun smorgasbord of foods! I'm sharing them with you because it was kind of hard to find a diverse grouping of what I myself consider "game day eats" and still keep it healthy and low carb, hopefully this post will help others find a group of recipes they want to make on their family's game day.

Here is the spread, though no, not all of it. I had lots of leftovers ;) :


Low Carb Game Day Spread ^-^
Michelob Ultra (not pictured) was drank by me ;). I added the beer bucket in the picture because though it was just us three I figured why wait to break out a fun beer bucket? Am I right? ;)


Here are the recipes I used:

Note: Arrowroot is by no means low carb, feel free to use Parmesan cheese in place of arrowroot. Also, substituted 1 Tblspn Garlic Powder for Garlic salt because we're looking to keep down the salt intake where we can.

Note: I cut the tops of the jalapenos off :( I later realized I should not have done this. I grabbed bacon and wrapped it around the jalapenos and cooked them this way in an effort to hold the cheesy insides in. This mostly worked. ;) They were still yummy!

Note: I substituted spicy brown mustard for the honey dijon.

Note: I substituted splenda for the sugar they called for.

And now for a few photos of the spread in the making...

You also might be wondering how I managed to make 32 Hard boiled eggs... I'm glad you asked... this was another pinterest find... I use pinterest search over google search these days, so far I've not had any finds flop ;). I saw a pinterest post by creativehomemaking that had the eggs in the oven like the photo below.


I followed the instructions and thought the eggs came out quite nicely. Granted, 32 eggs take a while to peel, but once they were all done... I was sure I'd made more than enough! 


Filling them with the mix was *so* much fun!


Adding Paprika to make 'em pretty ;)


*****


As I was chopping cilantro for the Cucumber Mix I decided I'd be a smart consumer ;) and freeze the leftover cilantro in an ice cube tray for a later date.
 My mister and I both enjoy cilantro so I know I'll use them before long. 


The cup to the left is bacon grease from the 3 bags of bacon I cooked up! Since it was still in liquid form I drizzled some of it in each of the cubes with cilantro as well and then filled then to the top with water.
 I think this will be a good mix when I go to pop one out and use it! :) 

*****
The Deviled eggs called for jalapenos so these are the ones I had left to work with when making the jalapeno bites.. and yes, I used disposable gloves when working with them and recommend it! ;)


Lastly, the chicken tenders went over well. I found that as they cooked they smelled as if they had bbq sauce on them. My husband did detect a sweet flavor, which was there from the coconut oil - we'll probably make these again using bacon grease. They don't take terribly long to make either which is a bonus! :) 


Well folks, that was the line up for game day eats! I hope you enjoy the recipes and photos, though I have to admit I'm wondering just how stellar my camera is these days as the photos seem slightly blurry/grainy... hmm... I hope it's not causing any headaches to look at them! ;) 
Though if they cause you to drool a little I'd say this is normal. Tee hee ;)

Thank you for reading! Please feel free to share if these recipes were a hit with your family too! 

Be safe out there friends! ;) ♥ Dawn 

Tuesday, August 13, 2013

Low Carb Green Bean Casserole with Chicken

My husband likes green beans from the can. This is one of the first few things I noticed we had in common before we'd even started dating. So when I found this low carb casserole that called for green beans I had to give it a whirl. And yes, I found it on pinterest ;).

The original recipe is found here on Justapinch.

Here I'm sharing with you my variation :).


Green Bean Casserole with Chicken

Ingredients:

2 cans french cut green beans
1 can regular cut green beans No Salt & No Sugar (in an effort to cut down the sodium)
3 lbs ground chicken
1 cup chopped onion
1 - 26 oz jar of Bea's Brooklyn's Vodka Sauce 
2 1/2 cups mozzarella cheese, shredded

To taste:
-Garlic powder
-Pepper
-Parmesan Cheese

Preheat oven to 375 degrees.

1) Pull out a 9 x 13 casserole dish and lightly sprinkle garlic powder on the bottom. Set aside. 
2) Open the cans of green beans, place them in a colander and towel dry if needed. Set aside.
3) In a large skillet add the chopped onion, stir until tender/translucent.
4) Add chicken to the skillet and cook until brown. Drain excess water.
5) Spoon about a third of the green beans into the casserole dish, then top with the chicken/onion mixture, then the vodka sauce and a third of the mozzarella cheese.  Continue layers until ingredients are exhausted. 

Sprinkle a layer of Parmesan cheese on top, then garlic powder and lastly pepper. 

Bake for 30 minutes at 375 until top layer is lightly brown. 

Enjoy!

PS - The mister said he thought it was pretty tasty. :) This is good. He's a very honest man ;). lol I myself appreciate the textures and flavors of this recipe. I've since found that this recipe reheats well too!


Wednesday, May 8, 2013

Chicken & Cheese Ham Burgers! Paleo Friendly and Low Carb

 ** Pan Kissed Chicken & Cheese Ham Burgers! **

Yes - it's kind of a play on words here - I was trying ;) tee hee
Thank you to SmokedandGrilled for the base of this recipe geniusness! After making them once I decided to add a few additional items to spice it up and add more of our families favorite ingredient - cheese ;). though in some Paleo variations this is not an accepted food. Feel free to omit if you're doing Whole30! But of course ;)

****I cannot wait till it stops raining long enough for me to get these on the grill! :)****

I mean pan seared salty flavor from the meats is great - but to add a smokiness to them with the grill? YUM! And yet I wonder - liquid smoke... there is such a thing... O.O ^-^ For now - let's share the recipe as it is today shall we? :) ;)


What you'll need:

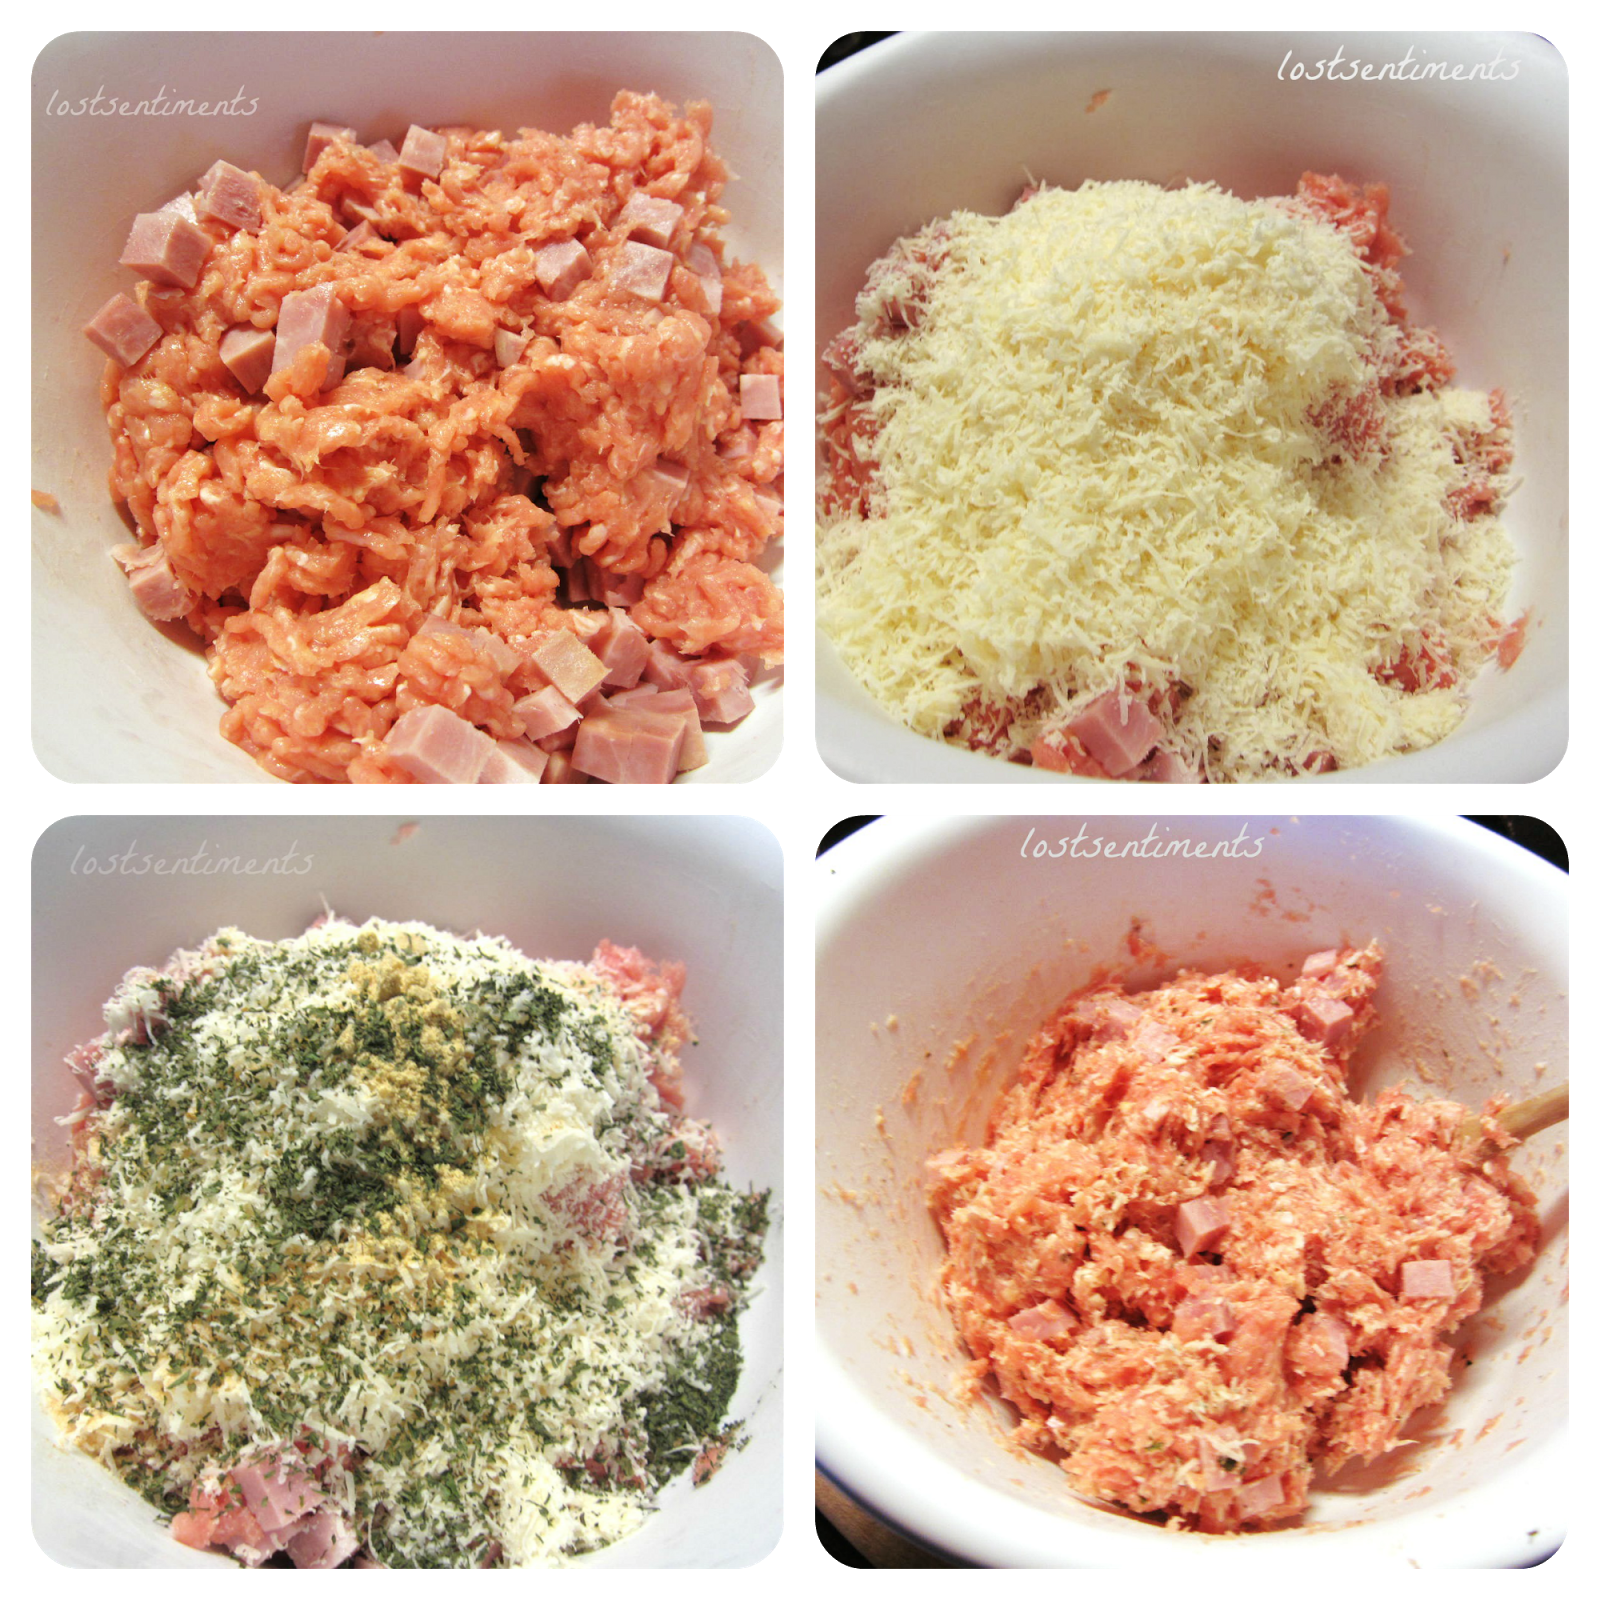
2lbs Ground Chicken
1 cup cooked ham - diced
2 cups Parmesan cheese - shredded
1/2 tsp garlic powder
1/2 tsp ground mustard
1 tsp cilantro

1) Mix up the meats first
2) Add the cheese and spices - mix well.
3) Form into burger patties and cook 'em up!


I'm a bit of a condiment nut folks, so it *should* mean a lot ;) when I say these burgers don't need anything but to be eaten as is. You will still find me pulling out mayo and Paleo Ketchup though to dress this up if I am feeling especially like an otter that day ;).

Makes about a 13 burgers :) Feel free to cute the recipe in half for smaller crowds. I normally make food with leftovers for work in mind. Adjust accordingly ;)

5.9.13 UPDATE: -

LEFTOVERS FOR WORK - for the win! ;)


Sunday, May 5, 2013

Fiesta Egg Bake Revisited - Low Carb & Paleo Friendly


Happy Cinco De Mayo! :) It just so happened I had most of the ingredients on hand that helped prompt me revisit a recipe I put together last August. Let's revisit this Fiesta Egg Bake shall we?

Fiesta Egg Bake

Ingredients:

- Bacon grease (or butter) to grease pan with
- 16 oz regular breakfast sausage 
- 1 red pepper (diced)
- 1 sweet onion (chopped)
- 1 garlic clove minced
- 1/3 c heavy whipping cream
- 12 eggs
- 1/4 tsp salt
- 1/4 tsp pepper
- 1 tsp ground mustard
- 1/2 tsp Tabasco sauce
- 1 jalapeno minced
- Dash cayenne pepper
- 4 cups shredded cheese


1) Preheat your oven to 350 degrees

2) Grease a 9" x 13" pan with bacon grease and set aside.  


3) Add sausage, red pepper, onion, garlic and jalapeno to a stove top pan. Cover mixture and let simmer until vegetables are tender.


4) As the vegetables and sausage are simmering, in a separate bowl mix together the eggs and spices, mix well.  Add the heavy whipping cream and whisk until its mixed well.


5) Once the sausage is browned and veggies are tender - add them to the 9" x 13" pan by spoonfuls making sure to spread the mixture out evenly.


6) Pour the egg and cream mixture on top of the sausage and veggies. Use a spatula to even out the mixture through out.


7) Sprinkle the cheese on top, using a spatula push the cheese down just until the egg mixture covers the top of the cheese.


8) Bake for 40 - 45 minutes or until the top is browning.


Now pull it out the oven and allow it to cool. The cheese is normally inflated and once it deflates a bit I know it's "go" time. ;) Time to eat! :D


I hope you like the recipe! :D 

Oh! Not only did I revisit this recipe but I managed to realize my avocado's were ripe enough to cut and store in the freezer for baking adventures later! :) This idea is brought to you by pinterest lol. But I had the foresight to execute it tonight! :D 
I'm super proud! 
The last time I got avocados I let them sit *too* long... they met their doom - the trash can. Womp. Womp. 

Happy Creating Everyone! :D ~Dawn

*****
Looking for more Low Carb recipes to bake? 
Since posting this recipe I've started a foodie blog! 

Find more low carb BAKING RECIPES HERE.

***** 

Sunday, April 28, 2013

Raspberry and Sour Cream Muffins with Lemon Zest!

Hello friends! 

I got curious again this weekend  - curious to see how a recipe from Things My Belly Likes would turn out! The pictures and ingredients looked promising enough so today we gave it a go!

Out with the ingredients and with a little help from the sister here is our adventure in photo form. The conclusion of our taste test fancy is at the bottom.


These smelled AMAZING while in the oven. The batter reminded me of those shortbread cookies that have a fruit jelly filling in the middle. Shortbread with a bit of tartness. Yummy right? :) 

I had them in the oven for 18 minutes since I put the batter together in 6 muffins 
(recipe says these make 8 small muffins.)

I put butter on the muffins, this would happen no matter what kind of muffins I make though. I love butter, basically muffins are a vehicle for butter in my world :).  

The raspberry bits reminded me of rhubarb. The tartness of the sour cream and lemon zest were delicious. :) If the mister would fall in love with coconut flour (he doesnt' like it but tries any new recipe I make even if it called for coconut flour - cause he's a trooper ;)) I would make these on a regular basis. 

All in all - a yummy muffin! :) Thank you Cat of Things My Belly Likes for sharing your culinary finds! :) 

Till next time - eat a bit of any batter okay? Why not? :0) 

Best, Dawn

Sunday, April 21, 2013

Low Carb Brownies vs Paleo Brownies

I tried two separate brownie recipes this weekend, and there was a marked difference in taste and texture.

Since neither of the recipes had comments about them I felt the need to make note to people who might do a google query about low carb and sugarfree/flourless brownies to blog about it.

Coconut flour and me get along most of the time, with the nutter butter sammiches there was just enough coconut flour that I was able to take a few bites before reaching for water. What can I say the flour is so dense that my throat needs a little help getting it to my belly. Is this TMI? lol sorry! There is a point to this though, how dense a cookie/cake/brownie is important! :D That being said, the Paleo Oreos - are much too much as far as denseness goes. I don't recommend them, I had to have a fulll glass of water for a tiny cookie. Just saying.

Alright, so the first brownie recipe I used was for the low carb brownies and it started off promising, with lots of butter and chocolate.


 No flour, but eggs and vanilla... more yum, right? I sprayed the pan, sprinkled it with cocoa and then added the mix to bake...


*ding* pulled these puppies out and not only did they smell a bit like burnt chocolate, after letting them cool 5 minutes they were crumbly as ever.. not the moist brownies one looks forward to. Unfortunately, they were overly dark chocolaty tasting and after 3 people tried to eat the concoction (as it turned to crumbs :s) I tossed the whole pan. Which is sad because chocolate is expensive! :s. What a bummer.


Back to the drawing board...

So the next recipe is a Paleo Brownie recipe calling for sour cream, coconut flour and the famous butter and chocolate.

Again this recipe initially looked promising... lots of chocolate and butter... add the eggs...


Put it in the oven 12 - 15 minutes... and this pan was edible! *SUCCESS!*


 I will put a stamp of edible approval on these brownies lol ;). They are also moist as a brownie should be and while yes, there is coconut flour they are moist enough that I'm not lunging toward the kitchen gasping for water... ;).

This has been another adventure in the kitchen - stay hungry my friends ;) until next time! :)

Sunday, April 7, 2013

Low Carb Nutter Butter Cookie Sammiches Recipe

Pinterest... has struck..again.

It's true I prefer using pinterest search over google search now at least when looking for recipes for the family. Recently I'm leaning more towards cookie finds that are either low carb and/or paleo friendly. I wish I could post up that I've lost some weight since going on this venture but at the moment I'm holding steady. But haven't been so active lately aside form the usual work, home chores, grocery shopping, cooking, etc. so I'd say it goes hand in hand ;).

I had a little bit of sunflower seed butter and other nut butters to use up and as fate would have it - I had just enough of the butters combined to make this recipe!  ☺


Okay - so enough sharing - lets get to the goods! Here is the recipe adapted from I breathe I'm hungry blog.

Recipe makes 9 very filling cookies

Cookies:
• 1 cup sliced water chestnuts
• 1/2 cup peanut butter chunky or creamy/sunflower seed butter 
• 3 tsp granulated splenda sweetener
• 1/4 cup flax meal (here I used the coffee grinder and ground up flax seeds to a powder ;)) 
• 1/3 cup coconut flour
• 1/4 tsp baking soda
• 1/2 tsp baking powder
• pinch of salt
optional: 5 Vanilla Stevia drops


Filling:
• 1/3 of any nut butter (peanut, almond, sunflower seed butter)
• 3 oz cream cheese at room temperature
• 1 tsp splenda sweetner
• 3 drops Vanilla Stevia

I suggest using a food processor for this recipe. We have a blender and near the end I pulled out the mix and tried to chop everything by hand, not fun☺.

Cookie:
• In a food processor (or blender, if you must ;)) put the nut butters, water chestnuts, splenda and 5 drops of Vanilla Stevia. Process until smooth.

• In a medium size bowl combine the dry items - flax meal, coconut flour, baking powder, baking soda and pinch of salt. A whisk works wonders to mix dry ingredients. :) Mix well.

• Add the wet mixture from the processor to the dry ingredients, mix until the batter is even. Now stick the mixture in the fridge for about 30 minutes to chill! The dough will be easier to work with this way ☺.

While the dough is chilling get out your baking sheet and line it with parchment paper. Set it aside.

Filling:
• Using a hand mixer, beat your cream cheese and splenda until fluffy.

• Add your nut butter and Vanilla Stevia drops. Blend until its thoroughly mixed. Set aside.

~~~~~~~~~~~~~~~~~~~~~~~~~~~~~~~~~~~~~~~~~~~~~~~~~~~~~~~~~~~~~~~~~~~~

When your dough is chilled pull it out of the fridge, preheat your oven to 375 degrees.

Next, locate your parchment lined baking sheet.

Get to rolling those balls! When you are done you should have a total of 18 balls which will equate to 9 yummy sammiches! ☺


Now grab a fork and create the peanut butter cookie cross hatch on each of them. Pop them babies in the oven for 15 minutes...


*DING*

Now that your cookies are baked - transfer them to a plate and put them in your freezer for 10 minutes. You want them room temperature or cooler to put the filling on.

I put them in the freezer for 10 minutes then got to adding the filling!

On 9 halves of the cookies add the filling and then add a cookie to the top - voila! 9 yummy low carb nut butter cookies! :) Enjoy!


A special thank you to the original creator of this recipe Mellissa Sevigny from I Breathe I'm Hungry - I'd have NEVER thought to use water chestnuts in cookies. This is a stroke of genius in my opinion. :)

Enjoy! I know I did! ;) ♥ Dawn

Monday, March 25, 2013

Low Carb Cauliflower Crust Pizza - No sauce, No flour, No Sugar, No Guilt

Cauliflower Crust Pizza Fresh out of the oven!

This is a recipe I need to credit pinterest for. I would have never conceived a cauliflower crusted pizza on my own... so thank you PinterestLisa & Megan who shared their creative genius and took pictures worth pinning so I could discover my own version :).

Lisa has a great recipe for Cauli-Rice that  I used as a guideline for making my own from frozen cauliflower bags.
2 - 16 oz  bags of frozen cauliflower out to thaw
Saturday morning I got up (rather late, don't let me fool you, I'm not early bird on Saturday ;)) and pulled these bags of cauliflower out to thaw for later. I suggest setting them on a towel to catch the water as they dethaw.

About 5-6 hours later I got to it! Preheated the oven to 350 degrees and the cauliflower was mostly thawed, I snipped open the bags and poured the contents into a microwave safe glass bowl. Thought I might mash them... did that for a little while and decided I'd chop them instead... this didn't last long before I got out the blender.. I was making some head way but my ears are sensitive and about 5 - 7 minutes later I transferred the mess back to the cutting board.

There are many ways to make Cauliflower Paste - no? ☺ However it works best for you to do it - do it!
In the end I used the CHOP CHOP CHOP CHOP CHOP method!


      So Chop, blend, puree until you can't do it anymore! ☺ Or until you aren't  seeing any "chunks".

  Then transfer the mess onto a flour sack towel. 


Use your hands and wrap the cauliflower like it's a burrito! ☺


Wrapped it up all the way to the end of the towel. The towel will be pretty wet. 


Move to the sink. 


Holding both ends like they are a tootsie roll wring the heck out of it!
It's pretty amazing how much water is in this vegetable! ☺

It's important to squeeze, squeeze, squeeze! The less water there is in the mix the less it tastes/smells like cauliflower :).

Once it seems there is no more water to wring out move the mix back to the bowl and unroll the cauliflower.


Put it all back in the bowl.


Fluff the mix until it resembles rice and then put it in the microwave with a napkin over it for 5 minutes. 

**Please use hot pads to pull the bowl out of the microwave & set on a hot pad as it will be very hot!**

At this point add one egg, 3/4 cup of feta cheese, 1 tsp oregano, 1/2 tsp garlic powder, 1/4 tsp pepper, and a pinch of salt. Stir well.

Next line the pan you will be using with parchment paper. Put the mixture of cauliflower dough on the pan and spread it out. I made mine into a circle but a rectangle will taste just as good! ☺

You can have your dough as thick or thin as you want just be sure the thickness is uniform throughout for even cooking!

Pop the crust in the oven for 35 - 40 minutes or until the edges are golden brown. 


I put 1 1/2 cups mozzarella cheese on top, drizzled olive oil on top and added more pepper with our pepper shaker. 


Then I added a layer of pepperoni! Nummy, nummy, nummy! ☺


Popped the pizza with toppings back in the oven for about 8 minutes for the toppings to melt. It came out really well! The whole family seemed to enjoy it!  I love this variation because it cuts out flour and sugar. Both of which I've been pulling out of my families diet when I can. You could call us moderately Paleo. I (clearly) haven't given up dairy... ;)  


So in review:

Low Carb Pizza

Ingredients:
• 2 16 oz bags of frozen cauliflower
• 1 egg
• 1 tsp oregano
• 1/2 tsp garlic powder
• 3/4 cup feta cheese
• 1/4 tsp pepper
• pinch of salt
• 1 1/2 cups mozzarella cheese 
• Olive oil to drizzle
• Pepperoni slices

Preheat oven to 350 degrees.

1) Chop, puree, or blend 2 - 16 oz bags of thawed frozen cauliflower into cauliflower mash (or rice :))
2) Wring the water out of the mixture.
3) Put in a microwave safe bowl and microwave for 5 minutes. 
4) Add egg, cheese, oregano, garlic powder, pepper, and a pinch of salt. Stir well.
5) Put parchment paper on pizza pan.
6) Place Cauliflower crust mix on parchment paper and form crust. Evenly spread mixture.
7) Bake in oven 35 - 40 minutes or until edges are golden brown.
8) Add cheese, olive oil and pepper (whatever other toppings you want☺)
9) Put pizza back in oven for about 8 - 10 minutes to allow for the toppings to melt. 
10) Cut pizza, serve warm and enjoy! ☺

Of course should you try this recipe for yourself I'd love to hear how it turned out! :) Happy adventures in the kitchen everyone! ☺Be safe out there! ♥ Dawn
Related Posts Plugin for WordPress, Blogger...