Showing posts with label Halloween. Show all posts

Monday, October 13, 2014

Free Amigurumi Pattern for Body of Large Doll

It's always quite an anticlimactic thing to finish a project. You work steadily for a while  and pour over the details of each stitch and then... you're done! Projects I take on without a pattern are at first quite daunting I'll admit. I have a perfectionist streak in me so there are times of frustration to be sure - lol. In the end its all worth it though. I have the finalized product and am usually pretty pleased with it. If not, I know much more when I go for round two!

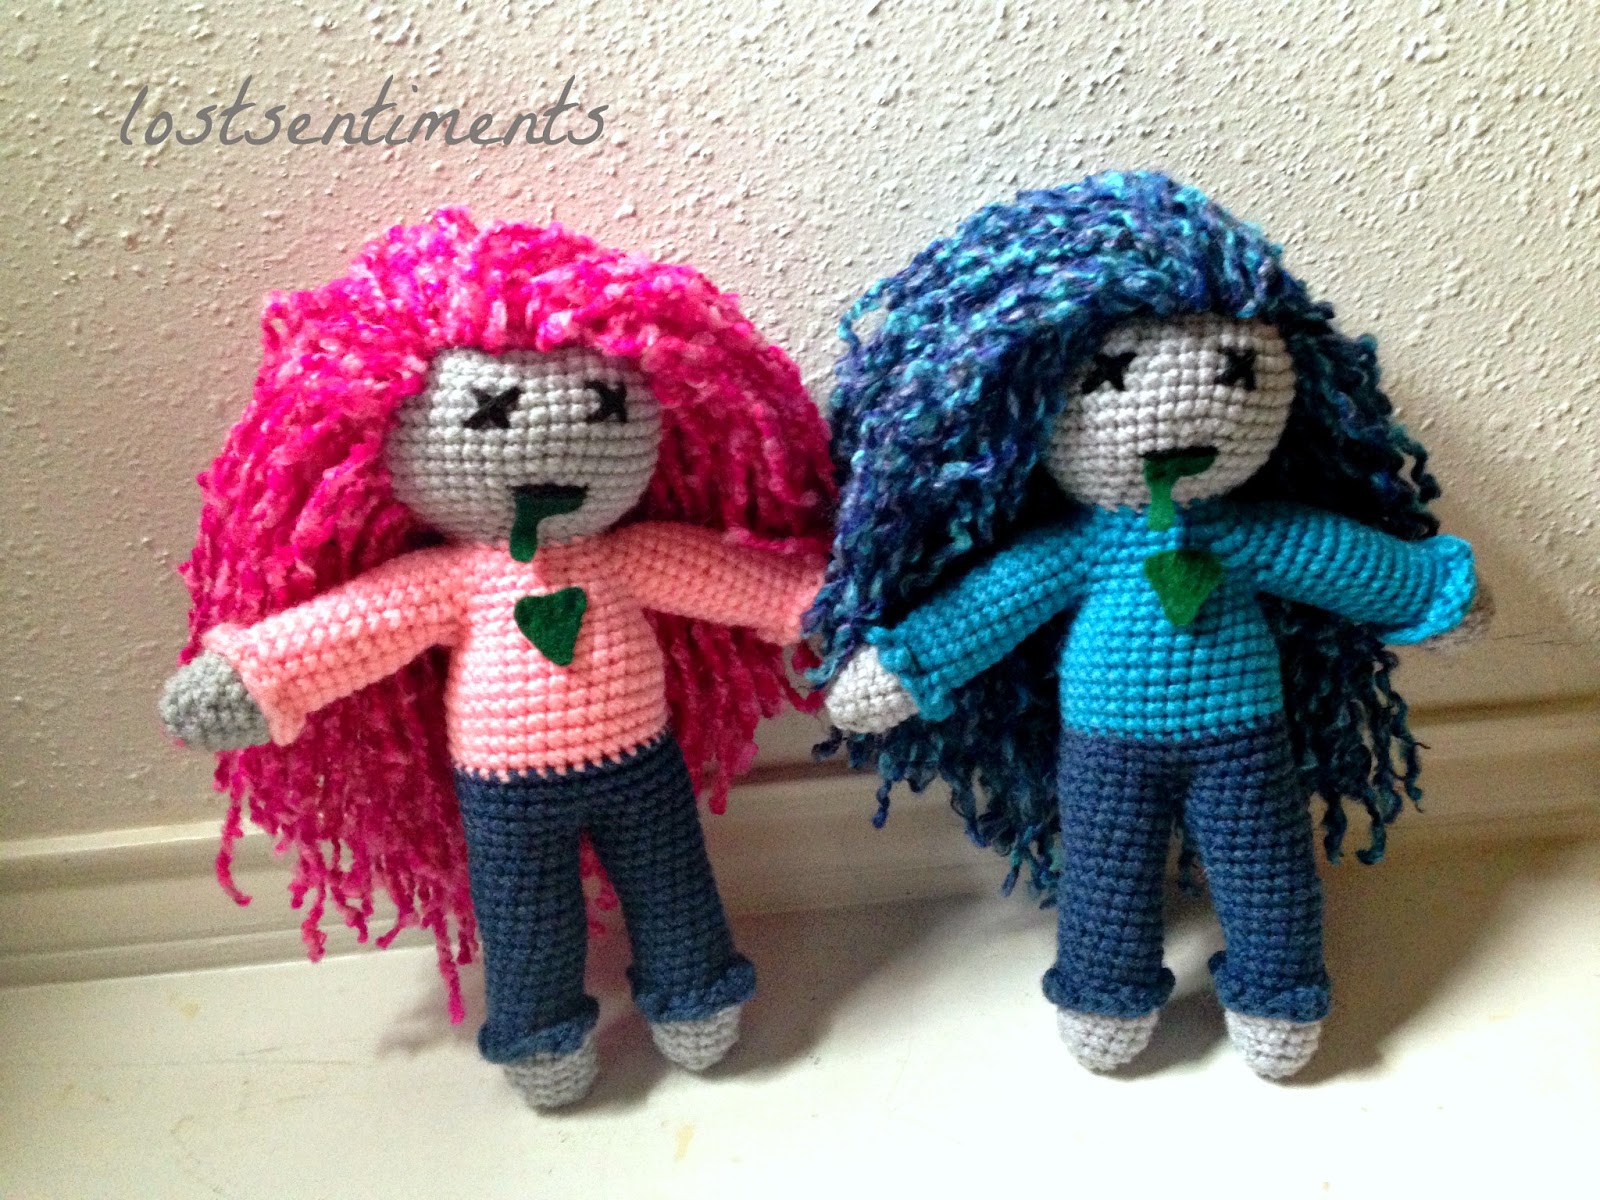
This pattern came to fruition because a friend of mine wanted these for her grandchildren after seeing my tinier version of a zombie - see photos here. I plan to offer the dolls themselves for sale in my etsy shop here.  For those of you who may be smitten with them but don't crochet this is definitely the way to go. They will be offered for a limited time, as the yarns used for at least one of the dolls is discontinued. Speaking of...specifically the pink hair on one of the zombies... (we'll call her strawberry ;) and the other with blue hair blueberry ;)) was discontinued, so I had to do some digging. I was able to find a few people willing to part with a skein or two for the right price to make sure I had enough to work with. Then I set to work. I started out with a large sketch to make sure I liked the proportions of the body, then tried several (about 5 -6 ) different versions of the "Ideal Sphere" to give me the head size I wanted. 


Amigurumi Large Doll Pattern
for the BODY only

Materials Needed:

- H Hook 8-5.00mm
- Skin color yarn worsted weight suggested
- Yarn for pants worsted weight suggested
- Yarn for shirt worsted weight suggested
- Tapestry Needle

Finished size: Approximately 11 inches tall & 8 ½ inches wide.

Abbreviations:

·         Sc = Single Crochet
·         X = times
·         Dec = Decrease
·         Inc = Increase
FLO = Front Loop Only
BLO = Back Loop Only
FO = Fasten Off

Gauge per inch: 4 stitches x 5 rows

With Light Gray Yarn: Work The Ideal Sphere  pattern with 22 Rows through row 20. You will have 18 stitches at this point.

BODY 

Using yarn selected for the shirt


Row 21: Sc around (18)

Row 22:  *Sc 2, Inc 1* Repeat 6 times to end (24)

Row 23:  Sc 1, *Inc 1, Sc 3* Repeat 5 times, Inc 1, Sc 2 (30)

Row 24:  *Sc 4, Inc 1* Repeat 6 times to end (36)

Row 25:  Sc 2, *Inc 1, Sc 5* Repeat 5 times, Inc 1, Sc 3 (42)

Row 26:  Sc 6, ch 2, skip the next 10 stitches from row 23, Sc into 17th St Sc 10, ch 2, skip the next 10 Stitches from row 23, Sc 5 ( At the end of Row 24 you should have 26 stitches, you will have 10 stitches on each side from Row 23 that you'll come back to finish later)

Row 27: Sc 6, Sc 2 across the ch 2, Sc 11, Sc 2 across the ch, Sc 5  (26)

Row 28:  Sc around (26)

Row 29:   Sc 6, Inc 1, Sc 1, Inc 1, Sc 10, Inc 1, Sc 1, Inc 1, Sc 4 (30)

Row 30:  Sc around (30)

Row 31:  Sc 7, Inc 1, Sc 2, Inc 1, Sc 11, Inc 1, Sc 2, Inc 1,  Sc 4 ( 34)

Row 30:  Sc around (34)


Row 31:   Sc 10, Dec 1, Sc 15, Dec 1, Sc 5 (32)

Row 32-33:  (2 Rounds) Sc around (32)

Switch to yarn selected for pants

Row 34 - 36: Sc around (32)


Row 37: Sc 2,  ch 2 skip next 16 stitches, sc in St 19, sc 13. this is the first leg round,  only work around on this leg until end: (18 stitches on 1st leg)

Row 38: (1st leg) Sc 2, Sc 2 in chains, Sc 14 (18)

Row 39: Sc around (18)

Row 40: Dec 1, Sc 2, Dec 1, Sc 12 (16)


Row 41: Sc around (16)

Row 42: Sc 1, Dec 1, Sc 13 (15)

Row 43 - 51 (9 rounds): Sc around (15)

Row 52: Work through Front Loop Only ( hc 1, dc1, sc 1, trc1, hc2, trc1, dc1, hc1, trc1, dc1, sc1, hc1, trc1 slst in 1st st (15) Fasten Off Blue.

Switch back to yarn selected for skin

Row 52 - 53 :Sc through Back Loop Only around (15)


Row 54: *Dec 1, Sc 3* Repeat 3 times (12)


Row 55 - 56: Sc around 12

Row 57: Dec 1 until 6 stitches remain, weave in end in the last 6 stitches and tie ends up.


***Stuff the leg and the body at this point***

Second Leg: 

Using yarn selected for pants


Row 37: Sc 16, chain 2, (18 stitches on 1st leg)


Row 38: Sc 16, Sc 2 in chains (18)

Row 39: Sc around (18)

Row 40: Dec 1, Sc 2, Dec 1, Sc 12 (16)


Row 41: Sc around (16)

Row 42: Dec 1, Sc 14 (15)

Row 43 - 51 (9 rounds): Sc around (15)

Row 52: Work through Front Loop Only (hc 1, dc1, sc 1, trc1, hc2, trc1, dc1, hc1, trc1, dc1, sc1, hc1, trc1, sc1, slst in 1st st (15) Fasten Off.

Switch back to yarn selected for skin

Row 52 - 53 :Sc through Back Loop Only around (15)


Row 54: *Dec 1, Sc 3* Repeat 3 times (12)


Row 55 - 56: Sc around 12


***Stuff the leg and at this point***

Row 57: Dec 1 until 6 stitches remain, weave in end in the last 6 stitches and tie ends up.

On the side that does not have the seam of round changes - consider this the back of the doll - with the front side facing you...


Right Arm: 

Switch to yarn selected for shirt

Row 1: Sc 4 in the bottom portion of the arm, Sc 10 (14)

Row 2 - 12:  Sc around (14)

Row 13: Work through Front Loop Only (hc 1, dc1, sc 1, trc1, hc2, trc1, dc1, hc1, trc1, dc1, sc1, hc1, trc1, slst in 1st st (14) Fasten Off.

Switch to yarn selected for skin

Row 14: Sc through Back Loop Only around (14)

Row 15: Sc around (14)

Row 16: *Dec , Sc 2 * Repeat  times (10)

Row 17 - 18: Sc around (10)

Row 19:  Dec 1 until 5 stitches remain, weave in end in the last 5 stitches and tie ends up.


   Now work the left arm same as the right. Stuff the body till it's as stiff as you want it.

   Sew up in between the legs using the yarn selected for the pants.

Add hair and facial features as you please. If there are enough requests I will add the description for the face and hair of the zombie dolls. This pattern is however just for the body of the doll.

*****

Please NOTE: 
This pattern is Copyright of Lostsentiments 2014.  All rights reserved.
You have permission to sell the finished item from this pattern but rewriting, reselling, distributing or copying the pattern itself is prohibited. 
Please include a link back to my etsy shop or blog in all sales/listings of items. 
Thank you for your understanding and cooperation.

Wednesday, September 24, 2014

Free Amigurumi Frog Prince Pattern


With Halloween just around the corner, it has me thinking on all the little princesses 
who will be trick or treating. 
Can I just say I haven't seen nearly as many dress up as prince charmings?!
The princess must have a counterpart with her no? 
I think this frog prince would be the perfect pairing with any princess costume! 
I give you the amigurumi pattern here free to be made at your leisure nearly a month in advance of trick or treating. I believe in you! ;) I believe in miracles too, and yarn... yarn that can make something to brighten any one's day... okay - ready, set, go! 
* Make some magic! :) *


Frog Prince Amigurumi Pattern 

Materials:
- Green 4ply yarn for body
- 4ply yarn for legs
- Size 10 Gold Crochet Thread for the crown
- 1 Pair gold safety eyes - 8mm
- Tapestry needle
- Stuffing
- Size 6 hook (1.80 MM)
- G hook (size 6- 4.25MM)

Finished size: Approximately 3 ½ inches from head to bum and 1 ¼ - 2 inches wide.

Abbreviations:
- Sc = Single Crochet
- Dc = Double Crochet
- FLO = Front Loop Only
- St = Stitch
- Sc2tog – Single Crochet 2 Together (decrease)
- Ch = Chain
- X = Times
- Rep = Repeat
- Inc = Increase by working sc’s in the same st
- Dec = Decrease
- Slst = Slip Stitch
- Trc = Triple Crochet2

BODY:

Using green yarn 

Round 1: Sc 8 in magic loop (8) – Put a marker at the end of each round to help keep your
place (this is optional of course)
Round 2: Sc 3 in the 1st st, 2sc in next, sc 2, sc 2 in next st (inc), 3sc in next, sc 2 (14)
Round 3: Sc 2, sc 3 in next st, sc1, sc 2 in next st (inc), sc 2, sc 2 in next st (inc), sc 1 sc3 in
next st, sc 4 (20)
Round 4: Sc 4, sc 3 in next st, sc 2, sc 2 in next st (inc), sc 4, sc 2 in next st (inc), sc 2, sc3
in next st, sc 4 (26)
Rounds 5 - 6: (2 Rounds) Sc around (26)
Round 7: Sc 5, sc2tog (dec), sc 1, sc 2 in next st (inc), sc 1, sc2tog (dec), sc 2, sc2tog (dec), sc
1, sc2 in next st (inc), sc 1, sc2tog (dec) sc 5 (24)
Round 8: Sc4, sc2tog (dec), sc3, sc2tog (dec), sc 2, sc2tog, sc 3, sc2tog, sc4 ( 20 )
Round 9: Sc4, sc2tog (dec), sc 1, sc 2 in next st (inc), sc 4, sc 2 in next sc (inc), sc 1, sc2tog
(dec), sc 4 ( 20)
Round 10: Sc 3, sc2tog, sc 3, sc2tog, sc2tog, sc 3, sc2tog, sc 3 (16)
Rounds 11 - 12: (2 Rounds) Sc around (16)
Round 13: Sc 1, sc2tog, sc 4, dec1, sc 4, sc2tog, sc 1 (13)
Round 14: Sc 4, inc 1, sc1, inc1, sc1, inc1, sc 4 (16)
Round 15: Sc3, inc1, sc 2, sc3 in next 1, sc2, sc3 in next 1, sc 2, inc1, sc 3 (22)
Round 16: Sc 2, inc1, sc1, dec1, sc2, dec1, sc2, dec1, sc2, dec1, sc1, inc1, sc2 (20)
Round 17: Sc2tog around (10)
Place eyes between rows 16 & 17 3 - 5 stitches apart - Stuff your frog at this point
Round 18: Sc 5, sc2 in next, sc3 in next, sc 2 in next, sc2 (14)
Round 19: Sc 1, sc2tog, sc2, sc2tog, sc3tog, sc2tog, sc2 (9)
Round 20: Sc 2 tog until 4 st remain
Weave in ends and pinch the nose to flatten the area that makes up the frogs mouth. 3

FRONT LEGS - Make 2

Using green yarn

Round 1: Sc 4 in magic loop (4)
Leave a length of thread hanging OUTside the leg in order to use this later to attached the
leg to the body.
Round 2: * Sc2 in 1st st (inc), sc 1 * Repeat once (6)
Rounds 3 - 5: (3 Rounds) Sc around (6)
Round 6: *Sc 1, dec 1* Repeat once (4)
Rounds 7 - 10: (3 Rounds) Sc around (4) on last round ch 3, turn
Round 11: (Dc1, tc1, ch2, dc1, tc1) All in next st, dc1, FO and weave in ends

BACK LEGS – Make 2

Using green yarn 

Round 1: Sc 4 in magic loop (4)
Leave a length of thread hanging OUTside the leg in order to use this later to attached the
leg to the body.
Round 2: * Sc2 in 1st st, sc 1 * Repeat once (6)
Rounds 3 - 5: (3 Rounds) Sc around (6)
Round 6: *Sc 1, dec 1* Repeat once (4)
Round 7: Sc around (4)
Round 8: * Sc2 in 1st st, sc 1 * Repeat once (6)
Round 9 - 11: (3 Rounds) Sc around (6)
Round 12: *Sc 1, dec 1* Repeat once (4)
Rounds 13 - 16: (3 Rounds) Sc around (4) on last round ch 3, turn
Round 17: (dc1, tc1, ch2, dc1, tc1) all in next st, dc1. FO and weave in ends. 4

With remaining thread, sew feet to your frog.
- Back legs 4th row 6 - 7 st apart
- Front legs 12th row 4 -5 st apart

CROWN:

Using size 10 thread and size 6 / 1.80 MM hook

Round 1: Ch 15, slst in 1st sc
Round 2: Ch 4, *dc,trc, ch2, trc* repeat to end, slst in top of 1st ch4, FO and weave in ends
Position the crown on the middle of the frogs head with one of the points of the crown
aligning with his nose in the front. Sew on between the 4th and 8th row however you like it
best. :)
Please NOTE: 
This pattern is Copyright of Lostsentiments 2012 - 2014.  All rights reserved.
You have permission to sell the finished item from this pattern but rewriting, reselling, distributing or copying the pattern itself is prohibited. 
Please include a link back to my etsy shop or blog in all sales/listings of items. 
Thank you for your understanding and cooperation.

Thursday, September 18, 2014

FrankenBunny Makes a Debut! Free Pattern Link Included! ;)

Halloween is just around the corner - you know how commercialized the Holidays are anymore so I'm sure you've even seen *gasp* Christmas trees at a few stores... I know I have. But first holidays first ;) Halloween will be here soon, ghosts, ghouls, vikings, sirens, pumpkins and creatures of all kinds will be roaming around looking for candy. My guess is, Frankenbunny and his friend Bunnicula might have been doing just that the night I spotted them... they didn't find my secret stash though! Haha!

I heard some rustling around and put a spotlight on them!

 O.O


At first they froze like a deer in the headlights.


 They must have realized I wasn't going to hurt them because they came up to me inquisitively...


Bunnicula kind of got in my face, very curious...


Out of no where R2D2 showed up 


and started to regulate the situation... I think they must be traveling somewhere together...


which makes sense really because they were made for a friend who has most of the star wars set and R2D2 wanted to make sure everyone got there in one piece.

Mission was eventually accomplished. *Insert big cheesy grin here*

Want to make your own Bunnicula or FrankenBunny? 
Enjoy! Muha

Monday, August 25, 2014

Bunnicula the Vampire Bunny - Free Amigurumi Crochet Pattern


I made one of these Bunnicula's recently and decided it was time to share this pattern with you lovely followers for FREE. If you work this guy up (watch out for the fangs!! O.O) and have ANY questions about the instructions please let me know. I'm here to help! :D 

Lastly, you might remember Bunnicula was a counterpart to his Sad Girl Miss from this post a while back :)
 ...ahhhh memories...


Bunnicula
The Vampire Bunny Pattern
(Frankenbunny is made with GREEN yarn :))


Materials:
·         White worsted weight yarn
·         1 Pair 10 mm Safety Eyes
·         Tapestry needle
·         H hook (size 8- 5.00MM)
·         Black worsted weight yarn for mouth

Finished zombie bunny will average 5 inches tall from feet to tip of ears and 1 3/4 inches wide.

Abbreviations:
·         Sc = Single Crochet
·         X = times
·         Dec = Decrease
·         Inc = Increase

Work through both loops of stitches unless otherwise indicated.

Using white yarn

Row 1: Chain 4, Sc 2 in 2nd  loop from hook, Sc 1, Sc3 in 1st chain, turn, Sc 1 (8)

Row 2: Inc 2, Inc 2, Sc 2, Inc 2, Inc 2, Sc 2 (16)

Row 3: Sc 2, Inc 1 (x2), Sc 6, Inc 1 (x2), Sc 4 (20)

Row 4: Sc 3, Inc 1 (x2), Sc 8, inc 1 (x2), Sc 5 (24)

Row 5 - 20: Sc around (24)


Between Rows 5 & 6: Place 10mm Safety eyes 4 stitches apart


Stuff body


Find the stitch in middle of the front, count 10 stitches back and mark this stitch.


Row 21: Sc 13, Chain 2, Sc in marked stitch on the back side of rabbit, move marker here.
                       
            Row 1: Sc around, Sc 2 over the chains (10)
            Row 2: Dec around until only 5 stitches remain, then weave in ends over last 5 and sew up                                bottom of the leg.

     2nd leg: On the front side of rabbit, count 4 stitches from made leg, In 5th stitch, start leg
            Row 1: Sc 8, Chain 2, put stitch marker here (10)
            Row 2: Sc around (10)
            Row 3: Dec around until only 5 stitches remain, then weave in ends over last 5 and sew up                              bottom of the leg.

With a length of thread sew up the bottom of the body, there should be 4 stitches on each side.

Arms: Make 2
Row 1: Sc 5 in magic circle
Row 2 – 7: Sc around (5) 
Fasten Off – leaving a length of thread to use later

Ears: Make 2
Row 1: Sc 4 in magic circle
Row 2:  Inc 1, Sc 1, Inc 1, Sc 1 (6)
Row 3 – 5: Sc around (6)
Row 6:  Dec 1, Sc 1, Dec 1, Sc 1 (4)
Row 7 - 8: Sc around (4)
Fasten Off – leaving a length of thread to use later sewing the ear on the head

Sew the ears directly above each eye 3 – 4 stitches apart.
Sew the arms on between Rows 9 – 10,  4  stitches apart.

Using black thread

Sew the mouth between rows 7 & 8 across 5 – 6 stitches.
Sew the nose in between the eyes, centered.

Now let the apocalypse begin! ^-^ Muha! ;)

Please NOTE: 
This pattern is Copyright to Lostsentiments. All rights reserved.
You have permission to sell the finished item from this pattern but rewriting, reselling, distributing or copying the pattern itself is prohibited. 
Please include a link back to my etsy shop or blog in all sales/listings of items. 
Thank you for your understanding and cooperation.


When friends bring me a cartoon or drawing to bring to life and the height they want, I have to sketch it  to be sure I get the doll to scale. Above is the sketch I made to use as a guide :). 
I recommend anyone who can draw and crochet to use this method. Granted you'll be working the doll up and pulling out the stitches from time to time, but hopefully it will spare some of your time! 

Happy creating friends! 

UPDATE:

If you would like to see the German translation of this pattern you can do so HERE. 
Kersten of fancrafts blog was ambitious enough to translate the pattern for you! :) 
Please show her blog some love as well!

Saturday, October 26, 2013

Paul Bunyan & Babe the Blue Ox Couples Costume...

 I'm going to let this post speak for itself... mostly... 

A last minute touch was the addition of black ribbon bow...

The horns I glittered and sewed onto a black fabric headband.


Ta-dah! The outfit all put together!


Making sure I could still dance in the outfit... robot style!


Doh! Don't forget the Tail~!


Yay! Woo hoo! Tail! :D

*****

Here we are - Paul Bunyan and Babe the Blue Ox...


And here I am about to head out the door! 


As you might have guessed the outfit was a hit! The couples costume was a hit! And most people thought I'd bought the outfit - score! :) One person asked if my nose ring was real, but nope, it was a fake piercing :). 

*****

Paul Bunyan.. I mean the husband loved that my heels made a clip clop sound when I walked because an ox would make that sound too! I, had not planned that! ;) :) 
The cow bell, was not quiet... but Paul Bunyan liked knowing where I was. ^-^ 

What are you going to be for Halloween?

Thursday, October 24, 2013

Babe the Blue Ox Costume... In the making

Pinterest has struck, yet again! For Halloween! :D Having been inspired by other pinners creativity, I recently tried to replicate a fun costume adding my own personal style and flair. Truth is, it was my husband who picked Paul Bunyan and Babe the Blue Ox costumes for us after looking at these photos. Often, he is my muse, he'll throw a project at me and I'll immediately make a comment about how its not possible, would take forever, etc ....then after I get over my fear of failure, I dive into the project, usually head first with little thought of just how long the project will take or any idea just how arduous the task might be. I adapt the Nike slogan and "just do it." I'm not 100% sure why, but I normally grumble a bit while working on these projects that he suggests and in the end, once I'm finished... I am SO glad I did them. Go husband. I ain't mad atcha... got nothin but love for ya ;). Ha :)

Originally my husband thought I was going to buy a blue dress to complete the look of Babe the Blue Ox. Instead, I decided I had to make my own, this was the only option in my mind. I mean, how else will the gauntlets and spats match the main portion? Hmmm? O.o

I found black faux fur at Michael's, along with some opaque glitter for the horns. I knew I had leftover air dry clay from my last decoden project, so I had what I needed for hte head piece. My sister and I went to Party City where she found a cow bell (score!) and I managed to locate some fake piercing jewelry, after all, all oxen have a ring in their nose! ;). We found a fake axe for the mister at Party City too! Yay! Later that same outing, lucky me scored some sateen fabric at Joann Fabrics, full of vivid blue hues and black! Once we got home, I pulled out a dress form I'd been given years ago, along with the sewing machine, ironing board, pins, thread, etc. I was pretty clueless as to how I would put this dress together, knowing I had to start SOMEwhere I googled "pencil dress", "fitted dress" eventually stumbling onto Jezebel's DIY for a custom fitted dress blog post. I didn't have muslin, so I improvised with a large sturdy plastic bag. Though it worked, I don't recommend it, halfway through putting the pinned sack on, I realized I could suffocate and should probably be supervised while putting it on. Ha! ;)

Long, long story short... through lots of pinning, adjusting, thinking, trial and error, more thinking, staying up too late, gnashing of teeth, repinning, sewing, seam ripping, sewing again, brainstorming and googling.. my dress... FITS. (Where is my triumphant music?! Insert some here ;)) Yup... but because I still need to do some blind stitching and add hooks and eyes to the top of the zipper parts on the dress body I will at least share with you the gauntlets, spats, tail, glittered horns ^-^ and  my cowbell.. eh-hem... Babe's cowbell ;).


I hope to take a few photos of the get up once everything is on and I'm with my mister Paul Bunyan  - I am looking forward to the costume party, it's this Saturday!!!! Admittedly, I spent a ridiculous amount of hours on this outfit and the blue fabric has really stole my heart... grays, silver, blues and blacks... how I love to look at you! :)  LOL I hope you enjoy these few teaser photos too! ;) 


^-^

Wednesday, October 31, 2012

Happy Halloween!

Indeed! :) This was the best Halloween yet :) The foyer was decorated, I was in costume today to hand out candy and I got to see another happy customer model one of my creations :)

Look at this little cutie! :) He's the roughest toughest viking there is! Just look at how he sharpens his ax with his teeth! :) ;) That would intimidate anybody who might have to fight him, no? ;)

This lil boys parents are super awesome - not only did they get him a hand knit viking hat (complete with horns and faux knit fur!) and a matchin fur vest,  but they made his stroller into a boat as well! :) I'm so glad to be sharing these photos with you - compliments of his mother :). Thank you again Julie! :)


...to all you followers of lostsentiments here, facebook and twitter ... here's to you! :) 
I'd get you a cold one if I could to show my appreciation! :) And if I could I'd do it in the costume I had on today compliments of an awesome co-worker :) You all rock! :) Many many thanks! I hope you all had a happy and safe Halloween! :) 


Monday, October 8, 2012

We were off to see the Wizard...

... and then HR rained on our parade. ;p

Now, now, in all fairness decorations to our proportions at work might never before been tried (we really went all out!) but you don't know if you don't try right? :) ;)

You might remember my fantaboulous coworker Laura, who ordered a flamingo, a collared necklace, later a set of matching cuffs etc. she's a muse what can I say!? :)  Laura does well to get creative in her own ways acting on both the silver screen and in theater.  Laura had an awesome idea to decorate our cubes with the theme of The Wizard of Oz for the month of October. The first Monday of October our cubes were each donned with our character of choice, I was Dorothy and had an awesome cartoon bubble that says "there's no place like home" and it was above my desk. Laura even brought a tiny stuffed dog in a basket with blue and white gingham fabric.. so fitting... other coworkers were the lollipop guild, complete with spinning lollipops and dum dums lining the cube walls for people to eat... the lion character had garland and a crown of twigs and leaves... so cute :), tin man, scarecrow, the great Oz complete with a curtain that said "Pay no attention to the man behind the curtain" too funny... Emerald city, the white witch and Laura was the wicked witch... it was so much fun! Everyday we'd bring in something more to add to the decor I was feeling a bit cozier in my cube with the decorations... I should have been a teacher ;).

We enjoyed our decorations almost a full week... Friday afternoon we were told to take them down... to say it was a bummer is an understatement... as we took down decorations even the VP of the company asked why... it would seem most people liked the decorations... people who saw me outside the office would ask about what character I was from the team it seemed to be a fun morale lifter but I suppose in any crowd there's bound to be one sorry sap, one party pooper... one sour puss :p

I tell  you this to preface the decorations I'm about to share below... the decorations at work were coming down and heading into the trash... I don't have many Halloween decorations, actually while looking for decorations for the Wizard of Oz theme I found out I might have thrown out the shoe box full I had (with a costume in it :( ) the girls gave me the decorations to take home since they don't have room for storage...

These decorations are for them. I realize its early in October and in truth I don't decorate for Halloween but this, this is for the girls (may our decorations live on!!) and the lil kids who come to the door for candy on Halloween. I hope you like them. I had a lot of fun stringing the cobwebs around and am oddly enough thankful we have a split foyer to do this in :).


Oh! Too funny, after I put them up my sister told me we should call the exterminators since she'd seen a lot of activity near the front  door. HAHAHAHA :) 


Related Posts Plugin for WordPress, Blogger...